This article presents an overview of Open Value Networks and then jumps right into a tutorial on how to install the valuenet GitHub repository on a Linux VM running in VirtualBox on a Windows machine.
What are Open Value Networks?
If the term Open Value Networks (OVNs) is new to you, that's not surprising. They are far from a well-established business model, but the idea is beautiful and potentially world-changing. Here are a few links to bring you up to speed:
- Owning Is the New Sharing - Opinion piece introducing the concept of OVNs and the few OVNs in existence.
- Sensorica - An Open Hardware company trailblazing the way for Open Value Networks. They use the valuenet software to track their accounting.
- How Platform Coops Can Beat Death Stars - Another great opinion piece on the world-changing possibilities of OVNs.
- An excellent definition on Open Value Networks with source links.
- Loomio - An excellent app that can be used for democratic decision making within a group. This is a great tool for both OVNs and Open Cooperatives.
- Open Cooperatives - not exactly the same thing as OVNs, but good reference material.
I'm writing this tutorial because at some point I'd like to dabble with a new business model using a hybrid of an Open Value Network and an Open Cooperative, using Loomio to make democratic policy decisions within the company, and the Value Network Accounting software for tracking equity distributions. However, the valuenet software needs contributors, so I figure the best way to prepare for my dream is to participate in the software's development. You should too!
How to Install the Value Network Accounting Software:
The Value Network Accounting software is an implementation of Network Resource Accounting (NRP) software, used to track expenses and labor used in an open value network (OVN) like Sensorica. There is a slide deck of tutorials showing how to use the software. I've found that the best way to digest the tutorials is to install my own local copy of the software in order to play with it. The instructions below are adapted from the original installation instructions in the GitHub repository.
The instructions below are for installing the Value Network Accounting software on a Windows machine running a Linux Virtual Machine (VM) using VirtualBox. I was using the Windows 8.1 64-bit OS and using VirtualBox v5.0.10. I installed Ubuntu 14.04.03 Desktop 64-bit on the Linux VM. Your mileage may vary.
Note: Even though I was using a 64 bit OS on my Lenovo laptop, VirtualBox would only allow me to install a 32 bit operating system. It turns out that Lenovo laptops (and other computers) need to Intel Virtualization Technology turned on in their BIOS to allow the installation of a 64 bit VM, as per this discussion thread and this blog post.
- Here is the download page for VirtualBox
- Here is the download page for Ubuntu 14.04.03 LTS 64-bit Desktop
I'm assuming the reader has the technical competence to install VirtualBox and the Ubuntu OS onto it. If you run into problems, use Google. There is a lot of good documentation that is very easy to find on all the intricacies of the installation process. From here, I will assume that you are looking at your Ubuntu VM desktop. In terms of VM resources, I setup the VM with a 12GB hard drive, 1024MB of RAM, and 2 processors.
Steps to Install Value Network Accounting
Environment Setup
There are a few helpful pieces of software we should install in the environment before installing the valuenet software. This will make use and development of the valuenet software a lot easier. It's a great idea to create a 'Base' snapshot of your VM when you're done with the section.
- Start by opening up a Terminal window. If you're brand new to Ubuntu, click on the Ubuntu icon in the upper left corner and type in Terminal, then hit enter. Text you should type into the terminal window are marked in italics below.
- When editing a text file, my preference is to use the nano text editor in the terminal. To open a file, enter nano textfile.txt in the terminal window. To exit the text editor hit Cntrl+x and answer y or n to weather you want to save the changes.
- Start by installing the Guest Additions CD. This will fix your screen if it's tiny and allow you to add and remove network cards. See the screenshot below. The CD should autoinstall a bunch of good stuff.
- After the Guest Additions finish installing, shut down the VM. With the VM shut down, install a Host-Only Adapter in the Virtualbox Manager. See the second screenshot below. You should also check out this tutorial on installing SSH on a Linux VM, which is where I'm going with this.
- Boot up the VM and Install the SSH server. I used this tutorial, which worked well for me. By getting the SSH server running, you can connect to your VM with PuTTY (or some other SSH terminal client) and work in your native Windows environment instead of switching back and forth between Windows and the Desktop.
- From the Terminal window inside the VM or using PuTTY, run the following two commands:
sudo apt-get update
sudo apt-get upgrade - Your environment is now setup! This is an awesome time to take a snapshot of your VM in VirtualBox Manager.

Screenshot of installing the VirtualBox Guest Additions CD
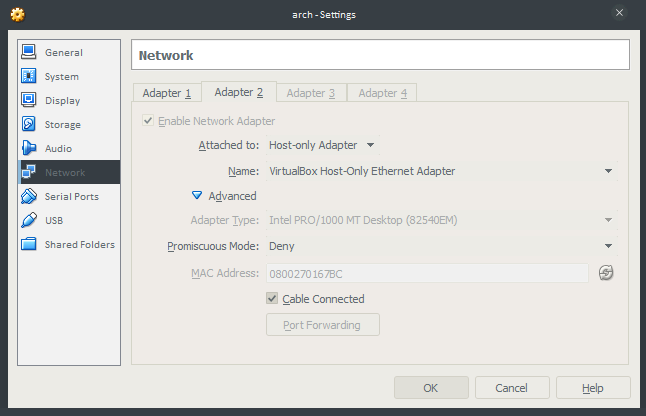
Installing a Host-Only Adapter in VirtualBox Manager
Installing the Value Network Accounting Software
Note: The original instructions pointed out that Python 2.7+, but not Python 3+ is required. This may be an issue in the future.
- Install python setup tools:
sudo apt-get install python-setuptools - Install Pip:
sudo easy_install pip - Instal virtualenv:
sudo pip install virtualenv - Install virtualenvwrapper:
sudo pip install virtualenvwrapper
export WORKON_HOME=~/Envs
mkdir -p $WORKON_HOME
source /usr/local/bin/virtualenvwrapper.sh - Git should be installed, but just in case, run:
sudo apt-get install git - Install PILlow (python image library). I found this discussion thread helpful.
sudo apt-get install libjpeg-dev
sudo apt-get install libtiff-dev
sudo apt-get install libfreetype6-dev
wget http://downloads.sourceforge.net/project/openjpeg.mirror/2.0.1/openjpeg-2.0.1.tar.gz
tar xzvf openjpeg-2.0.1.tar.gz
cd openjpeg-2.0.1/
sudo apt-get install cmake
cmake .
sudo make install
pip install pillow - Create a virtual environment:
cd
mkvirtualenv vn --system-site-packages
workon vn
cdvirtualenv - Clone the valuenet repository inside your virtual environment:
git clone https://github.com/valnet/valuenetwork.git
cd valuenetwork - Install the requirements:
pip install -r requirements.txt - Install easy-thumbnails:
pip install --no-deps easy_thumbnails - Create and initialize the SQLight database
./manage.py syncdb
./manage.py migrate - Install some starter facets and patterns:
./manage.py loaddata ./fixtures/starters.json
./manage.py loaddata ./fixtures/help.json - Run the tests to verify everything installed correctly:
./manage.py test valueaccounting - Create a local settings file and add the following line to it:
nano valuenetwork/local_settings.py
STATIC_URL = "/static/"
Cntl+X to exit, hit y to save. - Start the Django server:
./manage.py runserver
That should hopefully get the Django server running without any issues. You can then connect to the valuenet front end by opening a browser in the Ubuntu desktop and connecting to http://127.0.0.1:8000.
Running the Software After Reboot
Upon rebooting the VM, here are the commands you'll need to get the Django server and NRP software running again:
export WORKON_HOME=~/Envs
source /usr/local/bin/virtualenvwrapper.sh
workon vn
cdvirtualenv
cd valuenetwork
./manage.py runserver
By default, Django only binds to the localhost address of 127.0.0.1. If you want to serve pages to your windows host box, then start the server with this command:
./manage.py runserver 0.0.0.0:8000
That will start the server and allow you to access the page from the windows box by pointing a browser at the VMs IP address. For instance, something like http://192.168.56.101:8000.
So that completes the tutorial! Be sure to add comments below with your experiences, areas you got stuck on, and suggestions to others.