Posted in KeystoneJS
by Chris on October 21, 2017
I'm setting up a dev server for a new open source project I'm working on: P2P VPS.
I needed to enable CORS on the server so that my dev box could communicate with it. The first thing I tried was this old article that covers it, but it didn't work. Something had changed in KeystoneJS core since I wrote that article. However these two threads lead me to get CORS working for the regular API routes, like ConnextCMS uses.
However, I wasn't after the regular API routes. I was after the new(ish) Admin API in KeystoneJS core. This API allows one to log in remotely, which is what I would need while developing the Vue.js application on my dev box.
As it turned out, I needed to edit the node_modules/keystone/admin/server/app/createDynamicRouter.js file in my KeystoneJS installation, and add these lines to it:
        if (keystone.get('healthchecks')) {
                router.use('/server-health', require('./createHealthchecksHandler')(keystone));
        }

        router.use(function(req, res, next) { //allow cross origin requests
          res.setHeader("Access-Control-Allow-Methods", "POST, PUT, OPTIONS, DELETE, GET");
          res.header("Access-Control-Allow-Origin", "*");
          res.header("Access-Control-Allow-Headers", "Origin, X-Requested-With, Content-Type, Accept");
          next();
        });

        // Init API request helpers
        router.use('/api', require('../middleware/apiError'));
        router.use('/api', require('../middleware/logError'));
Inside the keystone.js file in the root directory of my project folder, I needed to add this setting:
keystone.set('cors allow origin', true);
After restarting the KeystoneJS software, I could now make an AJAX call to the Admin API, like this:
$.get('http://p2pvps.net/keystone/api/session', '', function(data){debugger;})
Read more...
by Chris on March 04, 2017
I'm a huge fan of TechSmith's Snagit product, which can be used to do screen capture videos. It makes communication with clients much easier. I can capture my screen, annotate what I'm doing with recorded audio, then send the video to my clients.
In one of the last Windows 10 updates, my audio recording stopped working however. After a lot of digging, I found this solution:
https://support.techsmith.com/hc/en-us/articles/226088987-Snagit-Windows-Snagit-12-Video-Audio-Not-Working-on-Windows-10
Although it specifically targets Snagit 12, the solution also worked for Snagit 11.4.3, which is the version I purchased a few years ago.
Read more...
Posted in KeystoneJS
by Chris on August 04, 2016
Shortly after publishing the first part of this article, I discovered an much easier way to generate a fresh project with a git-able version of KeystoneJS. Normally I don't have much luck with using the yeoman generator, but this time everything seems to be building great.
Follow steps 1 through 7 in the first part. From there, logged in as your normal user, run the following commands:
- npm install -g generator-keystone
- yo keystone
(This will install the keystone generator)
- node keystone.js
(After installing keystone, run this command to ensure that Keystone will actually launch.)
- cd node_modules
- git clone https://github.com/keystonejs/keystone
- cd keystone
- npm install
(Replace the default keystone directory with a clone of the KeystoneJS repository from GitHub)
Again, this worked for me on node version v4.2.6 and npm v3.5.2�. The result is the full demo install with a git-able KeystoneJS repository. For reference, the latest commit to the keystone master branch is this one.
Read more...
Posted in KeystoneJS
by Chris on July 31, 2016
This article describes how to get the basic KeystoneJS engine up and running on a Digital Ocean Droplet running Ubuntu 16.04. Following these instructions will get you a minimally running KeystoneJS with a cloned repository that you can update through git, make changes, and subit pull requests with.
Be sure to start with part 2 as it has more up-to-date information.
These instrucitons document how to install the latest version of KeystoneJS from source using a Digital Ocean droplet running Ubuntu 16.04. If you use another host or operating system, you mileage may vary.
I wanted to create this list of instructions mostly for myself, but I also plan to post a link on the KeystoneJS mailing list. Getting a KeystoneJS installation to run successfully is one of the biggest hurdles for potential new developers. Even if you get the Keystone yeoman generator to work, it does not create a repository clone that you can update with git. The install described here is minimal. It does not include the Admin UI files that come with the yeoman generator. But you can copy the output files from the yeoman generator if you successfully get the Keystone core running using these instructions.
1. Create a new Digital Ocean Droplet with Ubuntu 16.04. It needs to be a $10 droplet at minimum with 1GB of ram. The $5 512MB RAM Droplet is not powerful enough to compile KeystoneJS.�
2. Install Mongo DB by following this tutorial. No need to complete step 3, as MongoDB does not need to be accessible from the internet as we'll be interacting with it through KeystoneJS.�
3. As root, install the following packages:�
• apt-get install make
• apt-get install git
• apt-get install g++
4. As root, add a new user with sudo privledges.�
• adduser trout
• adduser trout sudo
�
5. As root, install Node and NPM. You can refer to various methods described here.
a. apt-get install -y nodejs-legacy
b. apt-get install -y npm�
As of this writing, this installed node v4.2.6 and npm 3.5.2�
6. Log in as your normal user. For this tutorial, I'll use the user 'trout'. From here, you should skip to step 11 and clone the repository containing the required libraries. For posterity, I've kept steps 7 through 10 to replicate the install from scratch as much as possible.�
7. Install the yeoman generator:
a. Sudo npm install -g yo�
It's important to run as sudo and use the -g option. Otherwise you won't be able to run the 'yo' command.�
8. Install the express generator:
a. npm install generator-node-express�
9. Create the directory that will contain the KeystoneJS system and cd into it. In this case, I'm calling the directory 'keystone-build'.
a. mkdir ~/keystone-build
b. cd ~/keystone-build�
10. Inside the keystone-build directory, run 'yo node-express'. I used the following options. Ultimately though, none of them matter.
a. Project name: Keystone
b. Libraries: all
c. Editors: none
d. Browser: Chrome
e. Heroku: No�
The code that represents the main file of your Keystone application is app.js.
11. Return to the parent 'keystone-build' directory. The following packages are needed by KeystoneJS but are not readily available in NPM, so I created a GitHub repository with the node_modules directory included. You can find it here. These libraries were copied from a working version of KeystoneJS.
a. serve-static
b. serve-favicon
c. body-parser
d. cookie-parser
e. multer�
My GitHub repository captures all the work done between steps 7 through 11. It contains the above libraries and an app.js file for running Keystone. It will overwrite the keystone-build directory. The above libraries can also be extracted from the yoeman keystone generator output, even if it does not build a running version of KeystoneJS.
a. cd
b. git clone https://github.com/christroutner/keystone-build�
12. Enter the node_modules directory and clone the KeystoneJS repository with this command:
a. cd ~/keystone-build/node_modules
b. rmdir keystone
c. git clone https://github.com/keystonejs/keystone�
13. Run npm install inside the keystone directory:
a. cd ~/keystone-build/node_modules/keystone
b. npm install�
14. Return to the parent 'keystone-build' directory. If you cloned the keystone-build repo, the app.js file will be ready to launch Keystone. This is a modified version of the code in the KeystoneJS Wiki.
a. node app.js�
Read more...
Posted in JavaScript
by Chris on May 24, 2016
Lately I've been using the Require.js library a lot to modularize my front end JavaScript applications. Require.js expects 'AMD compatible' JavaScript files that have the main program wrapped inside a define([], function(vars) {}) function. This format allows the file to explicity call out any files it depends on so that a library like Require.js can load all the files in the right order. The advantages are three fold:
- Race conditions are avoided by loading scripts in an explicit order.
- JavaScript files can be called on an as-needed basis rather than front loading everything, thus improving performance.
- It allows complex JavaScript programs to be modularized into small files that are mission specific. This is a best practice that helps with maintenance and collaboration.
The problem with wrapping a JavaScript file in this kind of function is that it breaks it's ability to work with normal HTML files that call JavaScript files with a <script> tag. The reason is that the global define() function doesn't exist unless your using an AMD loader like Require.js. This becomes a serious issue when trying to use a common file to store settings, like server IP addresses, ports, admin email addresses, etc. Attempting to share this file between your AMD app and normal HTML files isn't possible.
Through a lot of trial an error, I was able to create the following serverData.js file for use in my latest program:
/*
 * This file is the central location for setting the server info. It is set up to work with both vanilla JS files as well as AMD/Require.js enabled JS files.
 */
function getServerData() {

  var serverData = {

    //Development Server
    serverIp: '192.241.198.211',
    serverPort: '80', //Not Used
    mailPort: '8888',
    adminEmail: 'chris.troutner@gmail.com',

    //Separate each email address with a comma
    additionalEmails: ''

    /*
    //Production Server
    serverIp: '198.199.101.123',
    serverPort: '80', //Not Used
    adminEmail: 'ctroutner@skagitpublishing.com',
    additionalEmails: 'test@test.com,admin@test.com,marketing@test.com'
    */
  }

  return serverData;

};

//This little bit of code handles AMD enabled JS files that expect a define() function.
if ( typeof define === "function" && define.amd ) {
  define([], getServerData );
}
That last little code paragraph takes care of the AMD program. If the HTML file doesn't use AMD, it simply skips it. The function on top is 100% compatible with a normal HTML/JavaScript scheme. When this file is attached to an HTML file with a <script> tag, the getserverData() function becomes a global object. It can simply be called and the return value dumped into a local variable in order to get the server information.
Voila! All the important server information, emails, etc in one single location. This makes updates and maintenance easy.
Read more...
Posted in KeystoneJS
by Chris on December 08, 2015
I wanted to play around with the KeystoneJS CMS. This is a simple, bare-bones CMS that is natively written in JavaScript. It took quite a bit of work to get it up and running, so this page documents the steps involved to get a real, live running version.
I could have developed this on the Raspberry Pi, but instead opted to use a virtual server hosted by Digital Ocean. They only cost $5 per month and the ability to save and restore snapshots is even faster than re-flashing the SD card on the R-Pi. Either way, all the setup and configuration was done on the command line using SSH.
So without further ado, here are the steps I needed to take to get KeystoneJS up and running on a Ubuntu 14.04 Droplet:
- Log in as root
- Setup Mongo DB by executing the following code: (adapted from this Digital Ocean tutorial)
apt-key adv --keyserver hkp://keyserver.ubuntu.com:80 --recv 7F0CEB10
echo "deb http://repo.mongodb.org/apt/ubuntu "$(lsb_release -sc)"/mongodb-org/3.0 multiverse" | sudo tee /etc/apt/sources.list.d/mongodb-org-3.0.list
apt-get update && apt-get -y upgrade
sudo apt-get install -y mongodb-org
- Install the following support packages:
apt-get install make
apt-get install git
apt-get install g++
- Add a local user. In this case I’m calling him ‘trout’:
adduser trout
adduser trout sudo
- This is a great time to shutdown the VM and take a snapshot. (optional)
- Log in as your new user.
- Install NVM (to run older versions of Node and NPM).
curl -o- https://raw.githubusercontent.com/creationix/nvm/v0.29.0/install.sh | bash
- Log out and log back in as your regular user (‘trout’).
- Install Node 0.10.40:
Note: This will give you warnings that node and npm are outdated. Ignore these warnings. 0.10.13 is too old to work and 0.12.7 (latest as of this writing) will break KeystoneJS because it is too new. There may be other versions that work, but these are what I’ve tested.
nvm install 0.10.40
- Install the Yeoman Keystone Generator:
npm install -g generator-keystone
- Run the Yeoman Keystone Generator:
yo keystone
- Follow the on-screen prompts. Just hit Enter if you want to accept all quickly accept all defaults and test if you can even get KeystoneJS running.
- Change directory and run KeystoneJS:
By default KeystoneJS will install into a directory called ‘my-site’.
cd my-site
node keystone
- Access your new website view port 3000. If you’re using a Digital Ocean Droplet like me, you can simply type in the IP address is your web browser like this: http://555.555.555.555:3000. If you’re using a Raspberry Pi, use the IP address of your Pi.
These are the steps that I was able to take and get KeystoneJS up and running. I hope it helps other people from having to spend two days figuring them out, like it took me.
Read more...
Posted in KeystoneJS, JavaScript
by Chris on December 06, 2015
In Part 1 I provided the routing files necessary to open up the KeystoneJS API for accepting images. I also showed how to create a simple HTML form for uploading images and pointed out some of the limitations of the API. In Part 2 I'll show how to simulate a form with JavaScript so that images can be uploaded via JavaScript code rather than an HTML form. I'll also show how to use the JavaScript Caman.js library to edit images on a HTML5 canvas element, then upload them to the server.
Uploading Images Via JavaScript
Here is a very simple HTML form. Notice that the Submit button is of type 'button' and not 'submit'. It also has the onclick property set to the JavaScript function uploadImage().
<form>
  <input type="file" id="image_upload" onchange="displayUploadImage()">
  <br>
  <img id="imageToUpload" src="" />
  <br>
  <input type="button" value="Submit" onclick="uploadImage()">
</form>
Check out this code while I walk you through it:
function uploadImage() {
  var selectedFile = $('#image_upload').get(0).files[0];
  var fileName = selectedFile.name;

  //Create the FormData data object and append the file to it.
  var newImage = new FormData();
  newImage.append('image_upload', selectedFile); //This is the raw file that was selected

  var opts = {
    url: 'http://'+serverIp+':3000/api/imageupload/create',
    data: newImage,
    cache: false,
    contentType: false,
    processData: false,
    type: 'POST',
    success: function(data){
      console.log('Image upload ID: ' + data.image_upload._id);
    }
  };

  //Execute the AJAX operation.
  jQuery.ajax(opts);
}
The simple HTML form provides the user interface for retrieving a file. The first line of the JavaScript function assigns the selected file to to the selectedFile object. The object newImage is of type FormData, which is the JavaScript equivalent of a form. The selectedFile object is appended to it with the value 'image_upload'. This is all creating the JavaScript equivalent to the HTML form in Part 1.
Just as in our HTML form, we can't 'append' any values other than 'image_upload'. They will be ignored. Only the image can be uploaded. We can however update other values in the database with a second AJAX request once the image has been successfully uploaded.
The opts object further fleshes out the settings that our FormData object needs in order to upload the selected image correctly. KeystoneJS is very picky about its settings and it took me several hours to find the right combination above.
In the opts values, you'll see a function assigned to the 'success' key. When the image is uploaded, KeystoneJS will respond with the _id GUID it generates when creating the new database entry. It will return this value in response to the AJAX post request, so I display this value in the browser console. This value will be needed in order to update the image data with a second AJAX request.
The last line in the code above executes the AJAX request for uploading the image.
Displaying a Thumb Nail Image
In order to begin visually editing the image, the first step is to display the selected file in the browser. The code below for doing that is borrowed from this MDN tutorial. It's really weird and I'm not totally comfortable with the way they are doing it, but the code works in Chrome and Firefox and it's very compact, which is nice.
function displayUploadImage() {

  var imageFile = $('#image_upload').get(0).files[0];
  var imageToUpload = $('#imageToUpload')[0];


  //Display the selected image file in the browser
  var reader = new FileReader();      //Create a new FileReader object

  reader.onload = (function(aImg) {   //These functions are executed when the FileReader
    return function(e) {            //finishes reading the image file.
      aImg.src = e.target.result; //It displays the image file.
    };
  })(imageToUpload);

  reader.readAsDataURL(imageFile);    //Read the selected file with the FileReader.


  //Replace the image with a canvas element and control it with Caman.
  Caman("#imageToUpload", function () {

    //This is where I would do image manipulation like resizing and cropping.
    //For now this is just a place holder.
    this.brightness(5).render();
  });
}
After the image has been populated with the selected image file, the Caman function gets called to replace the image with an HTML5 canvas. Check out the CamanJS website, especially the example page that displays some of the in-browser editing you can do to an image. In the code above, all I do is adjust the brightness by 5%. The point is that this is the step where you'd edit your image: crop, scale, give the user a UI. Whatever you want.
Converting HTML5 Canvas to a File
So we've got two awesome ingredients: A way to upload image files to KeystoneJS and a way to edit images in the browser. How do we combine them? The answer to that my friends took me several hours to figure out. HTML Canvas elements are brand new and all the specifications around them have not been fully implemented into Chrome. The most common solution I found entailed converting the canvas image to ascii, uploading the ascii string to a server running a php script, and calling base64_decode() in the script. It was literally the only solution I could find after hours and hours of research, but I managed to come up with my own JavaScript based solution that avoids the use of PHP or extra server calls.
One of the HTML5 canvas specifications that haven't been implemented in Chrome yet is the .toBlob() function. This would be the easiest way convert the canvas to a file for upload via our JavaScript FormData object. The .toDataURL() function is widely implemented, which converts the canvas to an ascii string and results in all the nonsense with PHP and the base64_decode() function. However, the .toBlob() functionality is available as an external JavaScript library via this GitHub repository. Simply download the repository and include the canvas-to-blob.js file in your html. Thank you Sebastian Tschan!
Back to the uploadImage() function, Batman!
function uploadImage() {
  var selectedFile = $('#image_upload').get(0).files[0];
  var fileName = selectedFile.name;

  //Below I'll createa file based on the manipulatd Canvas.
  var canvas = $('#imageToUpload')[0];
  if (canvas.toBlob) { //Ensure the toBlob library is loaded
    canvas.toBlob( handleCanvasBlob, selectedFile.type );
  } else {
    console.error('Could not access toBlob library!');
    return;
  }
}


function handleCanvasBlob(blob) {

  var the_file = new File([blob], fileName, {type: blob.type});

  //Create the FormData data object and append the file to it.
  var newImage = new FormData();
  newImage.append('image_upload', the_file); //This is the raw file that was selected

  var opts = {
    url: 'http://'+serverIp+':3000/api/imageupload/create',
    data: newImage,
    cache: false,
    contentType: false,
    processData: false,
    type: 'POST',
    success: function(data){
      console.log('Image upload ID: ' + data.image_upload._id);
      }
    };

  jQuery.ajax(opts);
}
In the uploadImage() function, I add a call to the .toBlob() function. The handleCanvasBlob() function handles the callback when the browser finishes converting the canvas to a blob. The line new File([blob], fileName, {type: blob.type}); converts the Blob object into a File object. The code below that is just a copy of what was originally inside the uploadImage() function, which handles the file upload to KeystoneJS.
One thing to watch out for is that the filename does not survive this manipulation process. Notice that I call the object fileName in the File() constructor. This is a global variable that I used to store the file name.
Combining the information in Part 1 and Part 2, you can now allow users to upload an image, perform on-the-fly image editing, and then submit that image to KeystoneJS. Have fun!
Read more...
by Chris on December 01, 2015
This article presents an overview of Open Value Networks and then jumps right into a tutorial on how to install the valuenet GitHub repository on a Linux VM running in VirtualBox on a Windows machine.
What are Open Value Networks?
If the term Open Value Networks (OVNs) is new to you, that's not surprising. They are far from a well-established business model, but the idea is beautiful and potentially world-changing. Here are a few links to bring you up to speed:
- Owning Is the New Sharing - Opinion piece introducing the concept of OVNs and the few OVNs in existence.
- Sensorica - An Open Hardware company trailblazing the way for Open Value Networks. They use the valuenet software to track their accounting.
- How Platform Coops Can Beat Death Stars - Another great opinion piece on the world-changing possibilities of OVNs.
- An excellent definition on Open Value Networks with source links.
- Loomio - An excellent app that can be used for democratic decision making within a group. This is a great tool for both OVNs and Open Cooperatives.
- Open Cooperatives - not exactly the same thing as OVNs, but good reference material.
I'm writing this tutorial because at some point I'd like to dabble with a new business model using a hybrid of an Open Value Network and an Open Cooperative, using Loomio to make democratic policy decisions within the company, and the Value Network Accounting software for tracking equity distributions. However, the valuenet software needs contributors, so I figure the best way to prepare for my dream is to participate in the software's development. You should too!
How to Install the Value Network Accounting Software:
The Value Network Accounting software is an implementation of Network Resource Accounting (NRP) software, used to track expenses and labor used in an open value network (OVN) like Sensorica. There is a slide deck of tutorials showing how to use the software. I've found that the best way to digest the tutorials is to install my own local copy of the software in order to play with it. The instructions below are adapted from the original installation instructions in the GitHub repository.
The instructions below are for installing the Value Network Accounting software on a Windows machine running a Linux Virtual Machine (VM) using VirtualBox. I was using the Windows 8.1 64-bit OS and using VirtualBox v5.0.10. I installed Ubuntu 14.04.03 Desktop 64-bit on the Linux VM. Your mileage may vary.
Note: Even though I was using a 64 bit OS on my Lenovo laptop, VirtualBox would only allow me to install a 32 bit operating system. It turns out that Lenovo laptops (and other computers) need to Intel Virtualization Technology turned on in their BIOS to allow the installation of a 64 bit VM, as per this discussion thread and this blog post.
I'm assuming the reader has the technical competence to install VirtualBox and the Ubuntu OS onto it. If you run into problems, use Google. There is a lot of good documentation that is very easy to find on all the intricacies of the installation process. From here, I will assume that you are looking at your Ubuntu VM desktop. In terms of VM resources, I setup the VM with a 12GB hard drive, 1024MB of RAM, and 2 processors.
Steps to Install Value Network Accounting
Environment Setup
There are a few helpful pieces of software we should install in the environment before installing the valuenet software. This will make use and development of the valuenet software a lot easier. It's a great idea to create a 'Base' snapshot of your VM when you're done with the section.
- Start by opening up a Terminal window. If you're brand new to Ubuntu, click on the Ubuntu icon in the upper left corner and type in Terminal, then hit enter. Text you should type into the terminal window are marked in italics below.
- When editing a text file, my preference is to use the nano text editor in the terminal. To open a file, enter nano textfile.txt in the terminal window. To exit the text editor hit Cntrl+x and answer y or n to weather you want to save the changes.
- Start by installing the Guest Additions CD. This will fix your screen if it's tiny and allow you to add and remove network cards. See the screenshot below. The CD should autoinstall a bunch of good stuff.
- After the Guest Additions finish installing, shut down the VM. With the VM shut down, install a Host-Only Adapter in the Virtualbox Manager. See the second screenshot below. You should also check out this tutorial on installing SSH on a Linux VM, which is where I'm going with this.
- Boot up the VM and Install the SSH server. I used this tutorial, which worked well for me. By getting the SSH server running, you can connect to your VM with PuTTY (or some other SSH terminal client) and work in your native Windows environment instead of switching back and forth between Windows and the Desktop.
- From the Terminal window inside the VM or using PuTTY, run the following two commands:
sudo apt-get update
sudo apt-get upgrade
- Your environment is now setup! This is an awesome time to take a snapshot of your VM in VirtualBox Manager.

Screenshot of installing the VirtualBox Guest Additions CD
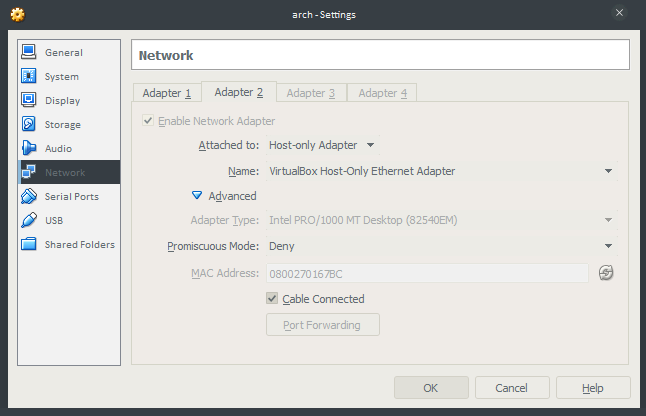
Installing a Host-Only Adapter in VirtualBox Manager
Installing the Value Network Accounting Software
Note: The original instructions pointed out that Python 2.7+, but not Python 3+ is required. This may be an issue in the future.
- Install python setup tools:
sudo apt-get install python-setuptools
- Install Pip:
sudo easy_install pip
- Instal virtualenv:
sudo pip install virtualenv
- Install virtualenvwrapper:
sudo pip install virtualenvwrapper
export WORKON_HOME=~/Envs
mkdir -p $WORKON_HOME
source /usr/local/bin/virtualenvwrapper.sh
- Git should be installed, but just in case, run:
sudo apt-get install git
- Install PILlow (python image library). I found this discussion thread helpful.
sudo apt-get install libjpeg-dev
sudo apt-get install libtiff-dev
sudo apt-get install libfreetype6-dev
wget http://downloads.sourceforge.net/project/openjpeg.mirror/2.0.1/openjpeg-2.0.1.tar.gz
tar xzvf openjpeg-2.0.1.tar.gz
cd openjpeg-2.0.1/
sudo apt-get install cmake
cmake .
sudo make install
pip install pillow
- Create a virtual environment:
cd
mkvirtualenv vn --system-site-packages
workon vn
cdvirtualenv
- Clone the valuenet repository inside your virtual environment:
git clone https://github.com/valnet/valuenetwork.git
cd valuenetwork
- Install the requirements:
pip install -r requirements.txt
- Install easy-thumbnails:
pip install --no-deps easy_thumbnails
- Create and initialize the SQLight database
./manage.py syncdb
./manage.py migrate
- Install some starter facets and patterns:
./manage.py loaddata ./fixtures/starters.json
./manage.py loaddata ./fixtures/help.json
- Run the tests to verify everything installed correctly:
./manage.py test valueaccounting
- Create a local settings file and add the following line to it:
nano valuenetwork/local_settings.py
STATIC_URL = "/static/"
Cntl+X to exit, hit y to save.
- Start the Django server:
./manage.py runserver
That should hopefully get the Django server running without any issues. You can then connect to the valuenet front end by opening a browser in the Ubuntu desktop and connecting to http://127.0.0.1:8000.
Running the Software After Reboot
Upon rebooting the VM, here are the commands you'll need to get the Django server and NRP software running again:
export WORKON_HOME=~/Envs
source /usr/local/bin/virtualenvwrapper.sh
workon vn
cdvirtualenv
cd valuenetwork
./manage.py runserver
By default, Django only binds to the localhost address of 127.0.0.1. If you want to serve pages to your windows host box, then start the server with this command:
./manage.py runserver 0.0.0.0:8000
That will start the server and allow you to access the page from the windows box by pointing a browser at the VMs IP address. For instance, something like http://192.168.56.101:8000.
So that completes the tutorial! Be sure to add comments below with your experiences, areas you got stuck on, and suggestions to others.
Read more...
Posted in KeystoneJS
by Chris on November 25, 2015
This week I struggled with implementing image uploads via the API. The first part of the struggle centered on hosting images locally. The second part focused on getting the uploads to work via the API.
Hosting Images Locally
Out of the box, KeystoneJS uses Cloudinary for image hosting. They are a fine service, but in my experience the life expectancy of internet companies is much lower than the lifetime of many websites I build. I really wanted to figure out how to host images locally. There were a lot of false starts on this aspect of the project, but ultimately I found the LocalFiles data type mentioned in the Keystone Database Documentation. That allowed me to create a new database model for uploading images.
The magic of KeystoneJS is that once you get the model coded correctly, the interface for it automagically appears in the Admin UI. That's great if you are building a site for yourself. However my primary focus on KeystoneJS is to use it as a CMS for non-tech-savvy clients. Turning them loose in the Admin UI could lead to all sorts of issues. That's why I wrote the tutorial on opening up the API, so that I could design custom back end pages to walk clients through the update of their sites.
Image Upload via the API
Uploading images via the API was not very straightforward, despite the fact that several people had resolved this issue before me. I found several historical threads on the KeystoneJS group mailing list asking for help with this same aspect. Unfortunately none of them came back to document a clear solution to their problem. Hopefully that will be resolved with this blog post.
Long story short, here are the routes/index.js and routes/api/imageupload.js files I put together to solve this issue. The export.create subfunction in the imageupload.js file is the only subfunction that differs greatly from the front end widget file used in the API tutorial. Here is an example of a simple HTML form that can upload images via the API once those files (and the model) are in place:
<form action="http://<your ip>:3000/api/imageupload/create" method="POST" enctype='multipart/form-data'>
  <input type="file" id="image_upload">
  <br>
  <input type="submit" value="Submit">
</form>
The important caveats of the code are:
- Based on historical mailing list threads, my understanding is that both the field name in the routes/api/imageupload.js file and the name of the HTML input field need to be named <field>_upload. In my case 'image_upload'. I might be wrong about both of them needing this, but that's what worked for me.
- The <form> enctype must be set as 'multipart/form-data'.
- I can only upload the image. If I try to set other features like the name or alt-tag, the POST request will puke. I plan to get around this by having two steps in my front end JavaScript. The first step will upload the image. The second step will update the image data with name, alt tag, ect. Again, there may be a work around for this. I just haven't found it yet.
That's the gist of how I got image uploads to work via the API. Check out this thread and this thread where I recorded some of the historical solutions I found and that summarize the information in this post.
Read more...
Posted in KeystoneJS, JavaScript
by Chris on November 24, 2015
KeystoneJS does not come with comments for the blog. I wanted to add some so that I can get feedback on my tutorials. I eventually decided to roll with the Disqus comments you see below. It wasn't my first pick, but ultimately, it was the fastest and easiest way to roll.
I started by reaching out to the KeystoneJS Google Group with this thread. A reply to that thread led me to this commit in the sydjs-site repository. I started trying to impliment comments this way, but I am not a fan of server-side rendering. I realize this is a bit of a contradiction since I'm such a KeystoneJS fan and it's *big* on server side rendering. Honestly, I probably would have passed on using KeystoneJS if I hadn't found out how to open the API so that I could pull data from the CMS and do client-side rendering with it.
So true to my nature, I started steps very similar to creating a Front End Widget in order to deal with comments. Here is a pastebin of the model I created in model/PostComment.js. I created an API for accessing the model the same way I did for the Front End Widget. I began doing the front end coding for adding and removing comments to blog posts when a though occured to me: "Can I really do this better than some 'free' option?"
I paused right there and started to look for embeddedable comment options. The two big contenders were Disqus and Discourse. Discourse has the disadvantage of requiring people to navigate away from a page and go to a Discourse forum page to leave a comment. I really didn't want that. I used Disqus when they first came out and it left a bad taste in my mouth. They were really spammy, but so far, I'm pretty happy with the lack of spam. Plus, they let people log in with social network credentials like Google and Facebook, and they integrate comment voting. Both very cool features that I like in the modern web.
So for better or worse, I went with Disqus. It was an easy decision and easy to impliment. I just added their code to the bottom of my templates/views/post.hbs file. Just above their embed code snippet, I added this code:
{{#if data}}
  <script type="text/javascript">
    var postUrl = 'http://christroutner.com/blog/post/{{data.post.slug}}';
    var postSlug = '{{data.post.slug}}';
  </script>
{{/if}}
I was then able to feed the postUrl and postSlug variables into the default Disqus embed code like this:
...
var disqus_config = function () {
this.page.url = postUrl; // Replace PAGE_URL with your page's canonical URL variable
this.page.identifier = postSlug; // Replace PAGE_IDENTIFIER with your page's unique identifier variable
};
...
Read more...