Table of Contents:
- Part 1 - Creating the Database Model
- Part 2 - Opening the KeystoneJS API
- Part 3 - Displaying the Widget on the Front End
- Part 4 - Editing the Widget on an Artificial Back End
- Part 5 - Password Protecting the Artificial Back End
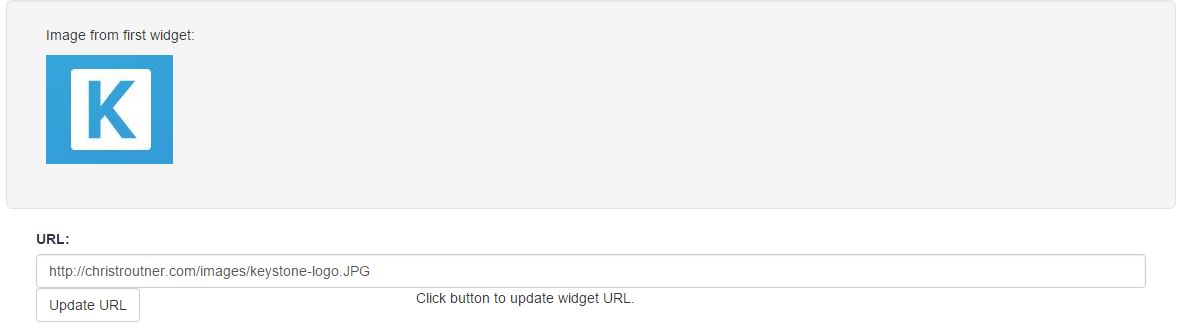
Updating widget data through the KeystoneJS API is very similar to retrieving it. Copy and paste the below code into an HTML file, update the server IP, and open it in a browser. It will generate a simple form that will allow you to update the URL of the first image in the first widget.
<!DOCTYPE html>

<!--
Note: You'll need the bootstrap css and js files and change the paths to them below.
-->

<html lang="en">
<head>
  <title>KeystoneJS API Example</title>

  <link href="css/bootstrap.min.css" media="all" rel="stylesheet" />
</head>
<body>


  <section>
    <div class='container'>
      <div class="row well well-lg">
        <div class="col-md-12">
          <p>Image from first widget:</p>
          <img id="image1" src="" alt="" />
          <br><br>
        </div>
      </div>

      <form action='' method="post" name='updateImgForm' id='updateImgForm' enctype='multipart/form-data'>
        <div class='form-group' >
          <div class='col-md-12'>
            <label for='widgetUrl'>URL:</label>
            <input class='form-control' type='text' id='widgetUrl' size="36">
          </div>
        </div>
        <div class='form-group' >
          <div class='col-md-4'>
              <button class="btn btn-default" type='button' id='oldUrlBtn' onclick='updateWidget()'>Update URL</button>
          </div>
          <div class='col-md-4'>
              <span id="checkMsg1">Click button to update widget URL.</span>
          </div>
          <div class='col-md-4'>

          </div>
        </div>
      </form>

    </div>
  </section>

  <script src="https://ajax.googleapis.com/ajax/libs/jquery/1.11.1/jquery.min.js"></script>
  <script src="js/bootstrap.min.js?body=1"></script>

  <script type="text/javascript">
    //Global Variables
    var serverIP = '<your ip here>';
    var JSONData;

    //First function that is called when the document finishes loading.
    $(document).ready( function() {

      //Call server to retrieve JSON Gallery data.
      $.getJSON('http://'+serverIP+':3000/api/frontendwidget/list', '', processJSON);
    });

    //Callback function executed when JSON data is returned.
    //Sorts the items in data.collections into different categories.
    function processJSON(data) {
      debugger;
      //Fill in the images with data from the KeystoneJS API
      $('#image1').attr('src', data.collections[0].url1);
      $('#image1').attr('alt', data.collections[0].alt1);
      $('#widgetUrl').val(data.collections[0].url1);

      JSONData = data; //Copy to global varible.
    }

    //This function is called when the 'Update URL' button is clicked.
    function updateWidget() {
      var collectionId = JSONData.collections[0]._id; //GUID of the first widget

      //Update the JSON data with the data from our form.
      JSONData.collections[0].url1 = $('#widgetUrl').val();

      //Send the JSON string to the server and log a copy on the console.
      console.log('JSON data sent: '+JSON.stringify(JSONData.collections[0])); //Used for debugging.
      $.getJSON('http://'+serverIP+':3000/api/frontendwidget/'+collectionId+'/update', JSONData.collections[0], validateChange);
    }

    //This function handles the AJAX callback from the server after a POST request has been sent to update the widget.
    //The purpose of this function is to validate that the data returned from the server matches the changes made.
    function validateChange(data) {

      //If the returned data matches the data in our form, then report a success.
      if( data.collection.url1 == $('#widgetUrl').val() ) {
        $('#checkMsg1').text('Widget successfully updated!');
      } else {
        $('#checkMsg1').text('Update failed!');
      }
    }

  </script>

</body>
</html>
Here's what the HTML page looks like:
To really study the code, I suggest you insert debugger statements at the top of each function and then run through the code line by line in Chrome Dev Tools. That way you can see the ways the API URL and other variables are getting manipulated.
The API is very picky about the format of the JSON, so it's best to simply manipulate the JSON returned by the server and then feed it back. If it doesn't like something, it won't complain, it simply won't update the widget. You can test if your changes were rejected by testing the returned JSON data against the manipulated JSON data.